Showing posts with label Facebook Tips & Tricks.. Show all posts

Gokano: collect points easily and receive free rewards with UNLIMITED TRICK to EARN UNLIMITED FREE REWARDS !!

0 comments
Hi everyone! We are back with another unlimited loot post! By following the below steps you can earn Unlimited Rewards from Gokano.


Gokano is a website which gives free reward for opening account daily and referring to people. It is an easy way to earn reward as it is not some creepy app which should be downloaded but is a web based rewarding system.You simply have to collect Gokano points to get free rewards.

How to get started with Gokano :-
  1. Simply Visit Here - Click Here
  2. Register a new account > Enter Name / Password / Email / Mobile / Shirt Size.
  3. Verify you are a Human and Agree their Terms to Register.

  4. Once Registered > Verify your Email address.
  5. Click on “Collect Daily Point” to Get 1 Point for daily Visits.
  6. Now Click on “Mission” and Complete Simple Mission to Get 1 More Point.
  7. Now Click on “Invite Friend” and Copy Your Referral Link.
  8. Share that Referral link with your friends to get more conversions.
  9. You’ll Get 1 Point For Every Friend Registers Through Your Link.
  10. Standard members earn 1 point for each of the actions above, while Gold members earn double the points! To receive the Gold rank (and get a free t-shirt along with it) you just need to invite 30 people! See proof at the bottom of this thread.
Prizes:
Gifts are divided in 3 categories: Gadgets, Electronics and Accessories.

Here's a screenshot of some of the Electronics prizes:


Prizes aren't always available, you need to wait for the restocks to order them!

Shipping:
Gokano is based in Poland (Europe) but they ship prizes to any country worldwide completely for free!
Prizes are shipped within 28 working days from order's date.

UNLIMITED TRICK:


  • Copy your Referral Link or note it down somewhere.
  • Paste your referral link and click on surf.
  • Now you will get redirected to the registration page.
  • Register a new account with a new email address and phone number and click register.
  • Now verify your email and you will reach to the dashboard.
  • Now log out of your account and open your old account.
  • And hurray! You will get your reward point in account.
  • Repeat the above step again with new email and phone number to get Unlimited Points.

Rewards :-


Gokano has three types of Reward Categories - Gadgets / Electronics / Accesories
  • Fountain Pen - 15 GN Points.
  • 16 GB Pendrive - 30 GN Points.
  • Sony Headphones - 60 GN Points.
  • Selfie Stick - 60 GN Points.
  • iPod Shuffle - 150 GN Points.
  • Casio Retro Watch - 150 GN Points.
  • Moto 360 Smart Watch - 550 GN Points.
  • Play Station 4 - 900 GN Points.
  • Apple iPhone 6 - 1500 GN Points.
  • MacBook Air - 2000 GN Points.


I already got my prize!

What are you waiting for? Sign up now!


Read More »

Increase Likes on Your Facebook Posts Easily like a Boss !!

9 comments

Here I'm with a new 100% free Facebook status, photos, videos, feeds AutoLiker that will increase likes on your Facebook with entering and using your access token and can be use at unlimited objects at unlimited times. Yes, You listen right. It's only require your access token and nothing else. We are using Official Skype App for getting token so don't worry about your account security. Now it's time to get directly likes on you status, photos, videos, feeds without any extra steps and work.  


So here I have a AutoLiker that is easy to use and quick to load and is designed to run on any platform through it's responsive design and cross browser support but we recommend Chrome because it's know as world best browser. Now without any more preface, here we go straight to the features list and have a look on then then check out the tutorial below that is step by step with screenshot also.

Features:

  1. Likes On Unlimited Status Without Any Time delay.
  2. Only Access Token Needed.
  3. Your Access Token Will Be Secure.
  4. This Works On Exchange Like Rule..
  5. 100% Free Of Scam And Spam.
  6. Will Not Post Anything From Your Account To Any Wall.
  7. Responsive Template For Every Platform.
  8. Quick To Load And Easy To Use.
  9. Simple And Stylish Template.
  10. Good Hosting Company...

Step By Step :

1.) First Of All , Allow Followers To Your Profile. For that Click Here & set Who Can Follow Me to Everybody.


Then Write A Status Or Upload A Pic And Make There Setting Visible To Public.

2.) Then open the Website Auto Liker [ After 5 seconds, Click 'Skip Ad' In Top Of Right Side] 

3.) Now open a New Tab & Click Here [ After 5 seconds, Click 'Skip Ad' In Top Of Right Side] Then you will redirect to a page, shown in the Below picture.


Then Click on Click Here to Get Access Token! button & Allow The Skype Official App.

4.) After allowing Skype Apps this link will leads you to move on new Page as shown in the Below picture. 


Then copy the URl og that page. Now goto the other tab. I mean Auto Liker main page & enter that URL to Input Field And Click "Submit Your Access Token" to proceed forward.

6.) After proceeding, You will here.


7.) Now click on the Green button named "Use Official Liker" & then you will redirect to the following page.


By Navigation tab , you can get Likes to any post!(Status Tab Will Be Open As Default). If you will Click On "Photo" Tab in the black menu bar, then you can Choose Your Desired Image from your Public Album.

8.) Now choose any Status or photo & Click on Submit button which placed in front of that post ( right side )and Wait....


9.) 
Now you have to wait about a minute and you will see a Loading Icon. Please Wait...


10.) Now after one Minute you will experienced 
POPUP message like 

"Success".

11.) Check out your Likes Count, Don't worry if you have low because it will remain increasing about 15-30 Minutes. Check again 
Later Or try Later..


12.) Now if you want Likes on other post, Just Reload the page and you have Full Rights to get Likes again with 15 Minutes time
Delay. 

Don't Forget To Share This! 


Increase Your Likes And Enjoy..! 

( If you want To Log Out from this Site, simply Click on "Log Out" Button in blue color. )


Ref_banner 928x90

Read More »

Confirm all your Friend Request at Once [ 2014 working trick ]

0 comments
Hey friends,
How will you feel when you login to your Facebook Account to discover you have received over 100+ Friend Requests over the time you were offline?

According to a recent survey, people are exited when they receive new friend requests, especially from the opposite sex. So why should someone be unhappy about receiving friend requests? The burden of clicking "Accept ” on each of everyone of such large number of friend requests received is boring and tiring, that’s why you will need to get over it immediately – accept all the requests. There is a piece of code which can solve all your problem once, it can accept all your pending friend requests with the click of a button.


So when you get a lot of friend requests and find it boring to click confirm on each one of them. Then just follow these steps and use it to confirm all friend requests with just 1 click. Simple!

Here are some steps to accept all friend requests at once :-

First and foremost, you must login into your Facebook account. Next you must Disable Secure Browsing. To do that , go to Settings & click on Secure tab. Then Disable Secure Browsing.


After that go to this link & tick in the box [please wait 5 seconds and press skip ad] »»» http://adbla.us/xrNC

Then you need to go to your Facebook pending request page. Click here [please wait 5 seconds and press skip ad] »»» http://adbla.us/MkVy to visit your Facebook pending request page.


Then scroll down to the bottom of the page to load all friend request. After load all friend request , now press  Ctrl + Shift + J  on your keyboard. It will come out with output & paste the following code in Console tab as shown in below screenshot.


Now press Enter & you will see... After few seconds , all your friend request will be accepted... 

Viola !! That's all... Good Luck !!


Ref_banner 928x90

Read More »

How To Enable Comment Reply Option In Facebook " Profile "

3 comments

This is an awesome trick on Facebook 2014. In 2013, Facebook enabled Reply button in comments for both Facebook pages and Facebook profiles. But this reply button feature is applicable to profiles having more than 10,000 followers and later Facebook removed it too and now Facebook is giving reply button feature to only officially verified profiles. So now by following the below procedure, you can also get reply button for your Facebook profile posts.

  If you not understand what I'm telling you  for more details..


Requirements to get reply option for your Facebook Profile!

1. Google Chrome 28 version or earlier
2. Manual Geo location 
Extension

Let’s begin !! There 2 ways for this trick. So I'll describe one way first...

Step 1. Download Google Chrome 28 version & install it. ( 32.13 MB ) [ If you Google Chrome 28 version or earlier , ignore this step ] [after you click on download button , click 'Skip Ad' in top of right side after 5 seconds]


Step 2. Open touch.facebook.com and login through your email & password.

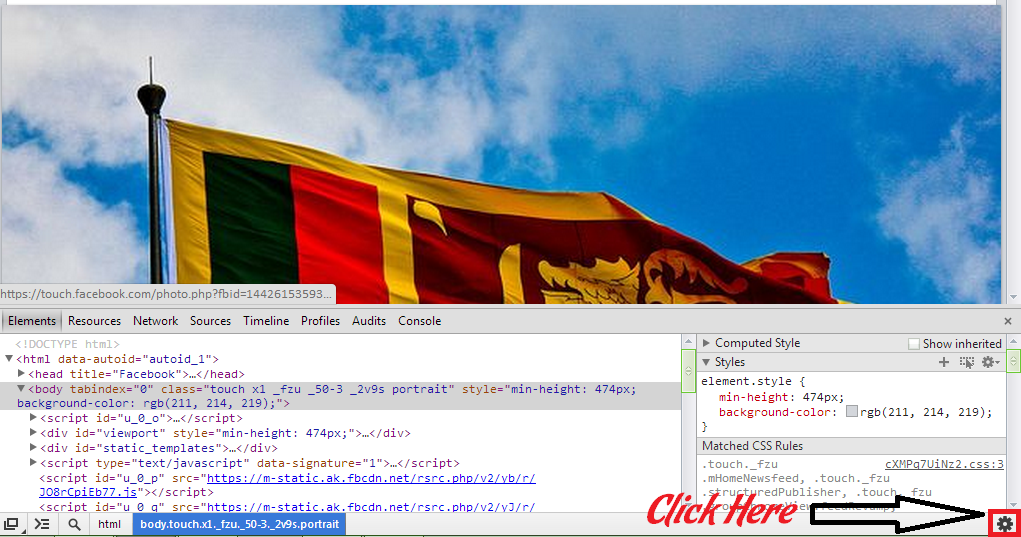
Step 3. Now Right click anywhere and click on inspect element

4. Now Click the Setting [gear]


Step 5. Now Click " Overrides " & Check/Enable “ Override Geolocation ”. 
Type/Copy those number in the boxes : Lat = -41.289996 Lon = 174.781555 
Then Close setting window and KEEP the inspect element window open . See image below :


Step 7. Just open a new tab and open www.facebook.com

Step 8. Done now make a post... Enjoy!!

Second way get reply option for your Facebook Profile!


Step 1: Install the Manual Geo location Extension (plugin) to your Chrome Browser. To download this extension , [after you click on download button , click 'Skip Ad' in top of right side after 5 seconds]


 Then you will get a icon in your chrome browser.


Step 2: Open touch.facebook.com and login through your email & password.

Step 3: Now Right click anywhere and click on inspect element

4. Now Click the Setting [gear]

Step 4: Now Click " Overrides " & Check/Enable “ Override Geolocation ”. 


Then Close setting window and KEEP the inspect element window open . See image below :


Step 5: Just open the Geo location and then make it Enable and set your location to New Zealand , just add “ New Zealand ” in the search box and you have done! 


Step 6. Just open a new tab and open www.facebook.com


Step 7. Done now make a post... Enjoy!!


If you have any question then feel free to ask!


Ref_banner 468 Ref_banner 928x90

Read More »

How To See Maximum Chatted or Messaged Facebook Friends & Count of Facebook Chats or Messages.

0 comments

Now lot of people use Social Networks in there Daily Life.
So , we can find lot of Social Network Site in the World. But , Facebook , Twitter , Google+ are Very popular in the World now.

Lot of people use this Facebook to find new Friends. So , they find a Best Friends , they chat with them in there Daily Life.
So , If u want to Find Maximum Chatted or Messaged Facebook Friends , You can use this Trick.

* First you have to click this Below Link. ( Link in the Below. )

* Now will Open a New Page.


1 - Now you can see Top 9 Maximum Chatted or Messaged Facebook Friends & Count of Chats or Messages in a Big Picture at Center of that page. 

( You can see this in Below Picture. )

2 - You can see All Facebook Chatted or Messaged Friends & Count of Chats or Messages.

( You can see this in Below Picture. )

[ If you can't see Picture Perfectly , Click on Picture. ]


If you Like this , Post your Comment.

Read More »

Tweet Now !!

Recommend us on Google!